If the wallets are deep and the dreaded budget talk is not a conversation piece around "your" diner table, then by all means your arts and craft brick and mortar store such as Michael's is a great place to start.
Here you will find a vast selection of frames ranging from modern to the good old traditional, craftsman styles. The good thing about this store is that you don't have to worry if you forgot your weekly coupon at home. I have always been offered the courtesy of a coupon code the staff at the register has hanging around the counter. "Talk about customer service."
On the other hand, if your dinner table conversations do revolve around the thought of "What does the budget look like for this month honey?"
Then you may want to stick around for some thrifty great ideas on How to frame your artwork.
_________________________________________________________________________
In this tutorial we will show a step by step process on making your artwork stand out from the usual pack.
Please Don't misinterpret what I'm stating here.
We simply wanted to experiment with the idea and therefore this was ideal for this project. We used the same concept to create other client spaces with the more expensive options. Note that frames sold at stores such as Michael's and others like it, already comes with its distinct finishes in stains and colors. Conversely this may be perfect for your budget,taste and design.
Here we painted the disjointed frames in a color that closely matched its backdrop (wall color). We did not want it to completely disappear, therefore did not paint it the same color as the wall. We thought keeping it within the same family of colors while giving it a different tone gave it more depth.
Don't worry We did not paint it
Ok. Now it is time for some nifty tricks we used to attached these babies to the wall. On the back of the frame we attached some self adhesive 3M Velcro tape.
Here in this magnified close up view we will show you how we attached the Velcro to the wall (Don't forget to scroll to the right). We first placed the frames against the wall and marked the spot with a pencil were the Velcro will go.
We then used an upholsters staple gun to attach the velcro strips to the wall because these staples are heavy duty.
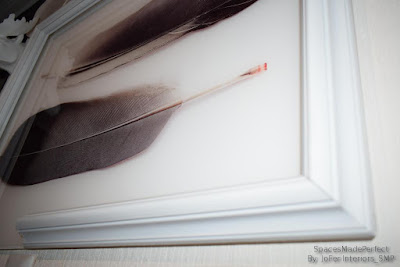
In this image you can view the this amazing glass art wall portrait with two of the frame angles on opposite corners. It is as thin as a mirrored glass.
Don't ask me how the image was printed on this wonderful piece of art. We picked up this amazing find at the Home Goods Store.
Here is a magnified side view shot of the frame attached to the wall.(May need to scroll top to bottom & right to left.)
Also please keep in mind that we are attempting to photograph a mirrored image. No matter what the lighting conditions, there is always a little degree of difficulty concerning reflections.
Nevertheless the intent of creating depth and focal interest was very much achieved. The Owners absolutely LOVED IT !
In this other BEAUTIFUL mirrored portrait we decided to paint the other set of frames in rust-oleum satin white spray paint and attached the frame angles to the image itself.
We used the same 3M Velcro tape attaching it to the frame and the picture. If you are using any type of glass art, make sure you cut the tape in small pieces. Tape sticks quite well to glass and therefore it will not require large pieces.
Conclusion: Stunning outcome. This was a great example of taking an idea and simply running with it. Whatever your design idea may be, don't stick to the basics. Whether you have a budget or no budget at all, make your design idea "YOURS."
Please take a further look into more of our D.I.Y projects and LIKE US when visiting our YouTube channel.


No comments:
Post a Comment