 |
Once again we will like to share with you an interesting project on how to makeover a vintage chandelier into a timeless piece,and what makes it appropriate for any seasonal change.
On one of our home decor shopping adventures, we came across this very unique and interesting item.
You guessed right !

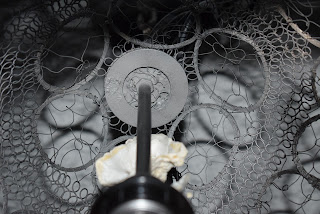
It is a wired handmade chandelier from India. A Vintage find at that. This was a great piece considering it's over sized and practically one of a kind.
The one thing we were not fond of, was the gold finish of the chandelier. Nevertheless, this was no deal breaker considering the potential this magnificent item would have once we added our personal touches and finishes.
In the close up image above you can see how we clustered a couple clam/Oyster shells with clear nylon fishing line by stringing the line through the pre-drilled holes on the shells.
Note: To the right of this post we have added a short video clip from Dremel on how to use this fabulous tool to also drill holes in shells.Video may not be visible for certain hand-held devices.
We then used a thin strand of aluminum wire to attach all the other bunched clusters, as you will see below.
As you can see above, each cluster was then attached to the aluminum wire by threading the wire through the clear nylon thread.
This will help the shells hang downward having a tear drop effect if you will. Come Again please! Just bare with us and you will see this come together as we move along.
We then proceeded to paint our vintage find with some of our favorite spray paints from Rust-Oleum.
Note: Do not go cheap on the paint. These cans were a little over $5 per can, but makes a big difference in the overall outcome.
We used Metallic shades for all colors. (Champagne Pink, Iced Gray, Black Iron,and Pearl Mist)were used to give this project its WOW effect !
In this shot we threaded the wire to the top of the chandelier and simply hooked it between one of the openings on the chandelier were the socket arm meets the top center portion.(It doesn't matter which side of the arm you choose to do this.)
If you don't see the aluminum wire, then we have accomplished one of our main goals (Keep the design as inconspicuous as possible).
No worries though, you will see more of the wire towards the bottom once you look close enough.
We also added this beautiful crystal bead link and facet ball of 40mm in diameter we purchased at crystal prism world.
You may of course choose to use as many links of crystals and any size crystal facet ball that suits your taste.
Note: As the seasons change you may choose to hang any interesting piece of item that better suits your space.
What looked like a simple black and grey repainted chandelier, now shows of its splendor boasting distinctive tones and metallic shimmers of color.
If you look closely at all the pictures you may notice how the different colors blend in at different areas of the chandelier.
Lastly we wanted to show you how this amazing piece displayed its charm throughout the dinning space by reflecting an amazing silhouette across the ceiling.
Picture taken with other lights in the surrounding are on,making shadows less pronounced.
This was truly unexpected and gracefully welcomed.
Another close up shot with other ambient lights throughout the living area switched off.
In this image you can appreciate how we added two more pendant strands of shells and also nestled a 20 mm crystal facet ball between the bottom sets of oyster shells.
Just one more shot with the chandelier lights off because we loved it ;0).
How about You !
Conclusion: a perfect find while shopping for decor items does not always mean you will find the perfect color, shape, or design. Nevertheless if the piece of item seems intricately unique and will add interest to your decor idea scheme you can always turn it into something that will truly make "YOUR" Spaces Made Perfect.
BELOW IS A LITTLE SNIPPET OF A VIDEO ON HOW THIS GORGEOUS PIECE TURNED OUT. ~ENJOY~
Publisher(s) Note: This non-sponsored video is exclusively for the
enjoyment of the viewers of this page.


No comments:
Post a Comment