 |
| Publisher's Note: Please note Image(s) on this post are unrelated to the Ad links throughout. Some third party native Ads may display related images. |
With all things considered have you ever looked at a particular area within your home, lets say a corner and thought "this space looks particularly empty," and what if there is no such corner. Most of us may have heard from time to time, whether it be by magazines and or "interior designer" that not every area in the home needs to be decorated.
Now lets face it, there are concepts in home decor that state "less is more" and "more is more." Our concept in home decor is simply "Decor as your heart Desires," after all it is your home, your space, and you are the one whom will be living in the space day after day.
Conversely, I must say that when it comes to creating a space were one can relax and maybe read a great book, newspaper, etc. your thought may guide you to believe that this particular space needs to come together in a corner of your home, or roundabout a window area in a room. Lets face it, whether you own or rent an apartment in the villas of France, Italy, or the suburbs of NYC and LA, your living square footage may not allow for such luxuries.
We at (JoFer Interiors) have created a desirable "nook stacular" area that anyone with a little imagination can duplicate while using furnishings that already exist in your home.In this post we decided to use some of our own pieces and purchased some interesting chic thrifty items.
How to create a Nook in a Small Apartment Home.
Here is an overview of what materials you will need in order to build a "to scale" reading and or leisure nook area that suits your needs and available space. For someone on a limited budget and somewhat of a mid level DIY skills, it shouldn't be a difficult process. We have also placed a short video clip to the right of this post, shared by Rust-Oleum. Here it demonstrates how to properly use their high quality spray paints. It mostly works the same for all colors across their product line.
1. Plan the area of use for the Nook by determining how the space will be utilized. Since the nook will share a common area within the living space we will not have to worry too much about color of walls unless you plan to make it a main focal point. Now if your intention is to as they say "Go Bold", then your choices of color are pretty much infinite.
2. Going "Bold" by
adding spontaneous splash of color on the wall which will serve as a
backdrop for you nook, should be just as the term states. Many will
suggest consulting the color wheel to determine your complimentary
colors and this is fine,
Nevertheless if courage is your stronghold, then going bold will have you choosing something completely opposite of the color wheel concept trend. For the purpose of this post we stuck with a simple neutral color palate that was already part of the existing color scheme through out the home.
Know where-ever you choose to purchase the type of paint we will leave up to you. We decided to go with BEHR [Source: Non sponsored]line up of Low VOC Blue/charcoal grey from Home Depot.
3. Making Sure Measurements are Precise will help you space things out as you choose the right pieces of furniture to fill the area of interest and the right size scale room divider that you will end up using as means of pulling off the this "Creative Nook Look".
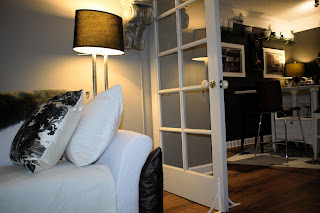
4. Choosing the appropriate Room Divider To create that atmosphere of separation while still allowing the room to feel open and transparent takes a little "thinking it through". For our design we used a salvaged glass windowed French door. Once again measurements are key as to making sure that it will project as far out as needed and as high to the ceiling as possible.
The glass in the french door allows for light to still bounce and reflects around the room.
Choosing the color of the divider, in this particular case the French Door does not necessarily have to match your walls.We prefer a matching door Reason being, our desire to keep an open airy feel to the space.
5. Putting the Pieces Together know that we have the color and the divider figured out,we can now focus on putting the act all together. Putting a good Nook area together doesn't need to be complicated, just think about what you like while keeping simple yet interesting.
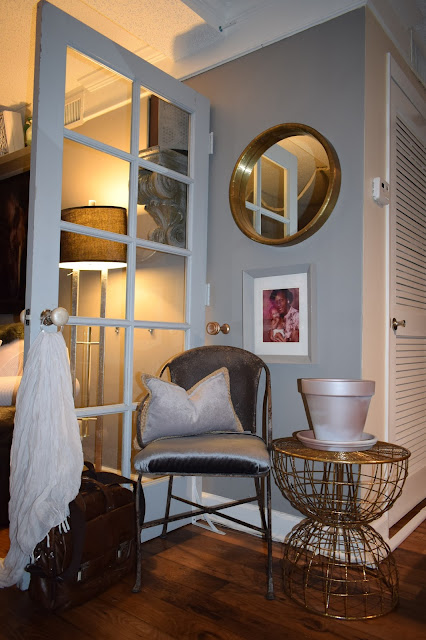
6. Textures and materials used in the space were among the silky smooth smoky grey velvet upholstery on the curvy vintage iron chair Jo~Ann [Source:Non sponsored]. Suede Corduroy pillow, a 28inch round gold frame mirror from Home Goods and a dark brown leather laptop shoulder bag. The throw is completely a matter of choice. This particular project took place in the winter season, therefore a cozy beautiful gold throw made sense. All these pieces give the area a personal useful feel.
Lets Start by viewing the small area above, between the floor lamp and the closet door. At first hand it seems as if not much could be done besides maybe hanging something on the wall.
We decided to go with a thrifty used one from a local store. No need to attach the door to the wall, as you may have noticed the L shape brackets used as legs. You may choose to use any decorative legs of your choice. Just make sure it matches and blends with your door color.
Just another angle of view top to Bottom. The french door still keeps the area free flowing and open.
Another view from the other side of the room.
Here we go, add a few pieces of your favorite furniture and make it yours. Simply make sure the seating is scaled to the the size of nook area you are choosing. here we went with small vintage iron arm chair. Add a few wall portraits or mirror to the wall, maybe a small side table to lay your favorite drink, flower(s) etc. and bingo there you have it.
If you have already noticed the scarf placed over the door nobs, this was an idea used to disguise the L shaped legs we used by draping it over. You may dress up the nook which color, style scarf of your choice.
We chose this inexpensive one from a local Target store or Target.com. Place a handbag or purse on the other side to hide the other leg. Place your favorite cozy throw over the arm and you'll have your own Nook "Stacular" masterpiece.
stores Home Goods . Here is one more thing to consider before you go. Get rid of the brass or silver door knobs and go with a silky smooth decorative knob instead. Vintage, craft man or wood it doesn't really matter, once again "make it yours", this will add an interesting touch to your door and overall design.
Conclusion: When adding a functional area to your home decor, forget the need to think that more space is what you need, hence a bigger home. On the other hand begin to think re-purpose, making use of things already existing in your storage and maybe switching things around will make it look different when placed at another angle in the room.
Using dividers is one of the most dynamic ways of adding interest to a space, as you can see in this tutorial on How to create a Nook in a small space.
Well there you have it, happy decorating and don't forget to check back with us to find out more interesting tales on interesting spaces. Links used on this post are of non sponsored sources.
Please enjoy this video snippet of how this space came together.
enjoyment of the viewers of this page.
Please stay with us for our next post on how our Nook "Stacular" Space came together.


1 comment:
This nook area is so creative. Gave me some great ideas. Thanks
Post a Comment